phoenix
18.Phoenix
18.1安装
上面我们学会了hbase的操作和原理,以及外部集成的mr的计算方式,但是我们在使用hbase的时候,有的时候我们要直接操作hbase做部分数据的查询和插入,这种原生的方式操作在工作过程中还是比较常见的,以上这些方式需要使用外部的框架进行协助处理,其实hbase也对外提供了一个直接的操作方式接口插件Phoenix,它和mr不一样,是直接集成在hbase之中的,通过一个工具使得hbase可以完全支持sql操作,其实我们可以将Phoenix当成是一个sql插件,一个可以写sql完成hbase操作的插件,并且在hbase中通过regionserver直接执行,还可以做sql的优化,是hbase免费开源出来的一个插件
安装:
# 解压Phoenix
ssh_root.sh tar -zxvf /public/software/bigdata/phoenix-hbase-2.4-5.1.2-bin.tar.gz -C /usr/local/
# 创建软连接
ssh_root.sh ln -s /usr/local/phoenix-hbase-2.4-5.1.2-bin/ /usr/local/phoenix
# 修改权限为hadoop
ssh_root.sh chown hadoop:hadoop -R /usr/local/phoenix-hbase-2.4-5.1.2-bin/
# 将server包复制到hbase下面
ssh_all.sh cp /usr/local/phoenix/phoenix-server-hbase-2.4-5.1.2.jar /usr/local/hbase/lib/
# 修改环境变量 所有机器都执行
echo 'export PHOENIX_HOME=/usr/local/phoenix' >> /etc/profile
echo 'export PHOENIX_CLASSPATH=$PHOENIX_HOME' >> /etc/profile
echo 'export PATH=$PATH:$PHOENIX_HOME/bin' >> /etc/profile
source /etc/profile
# 重启hbase
stop-hbase.sh
start-hbase.sh
# 连接Phoenix
sqlline.py nn1,nn2,s1:2181
# 直接连接zookeeper连接hbase
到此为止安装完毕
18.2 创建测试表
在phoenix中创建测试表,必须指定主键,主键对应hbase的rowkey。
-- 表名不带双引号,默认转成大写
create table phtest1(
    pk varchar not null primary key,
    col1 varchar,
    col2 varchar,
    col3 varchar
);
-- 表名带双引号,不转大写
create table "phtest2"(
    pk varchar not null primary key,
    col1 varchar,
    col2 varchar,
    col3 varchar
);

-- 查看表列表
!tables

-- 查看表结构
!describe "phtest1"
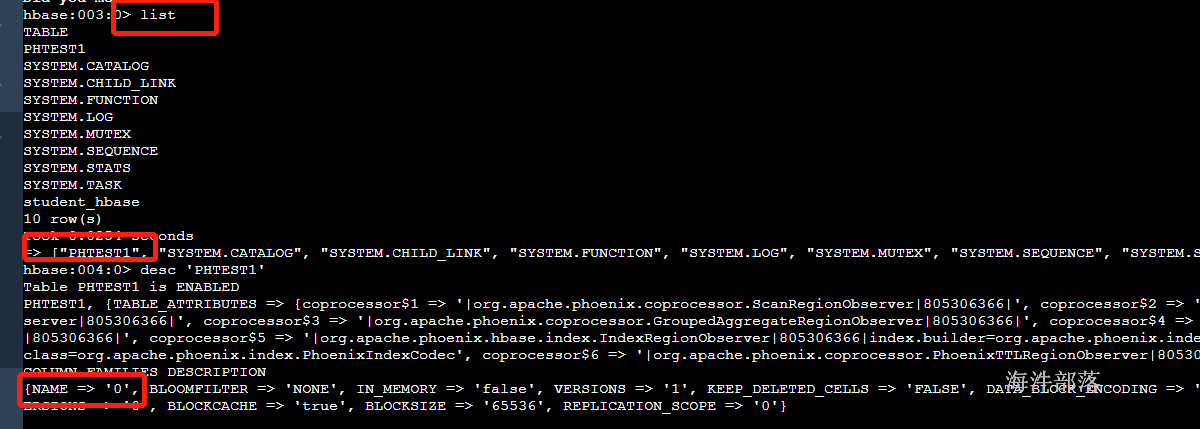
在hbase shell中查询(phoenix严格区分大小写,所有小写在phoenix中都会被翻译为大写)
18.3 插入/查询数据
-- upsert插入时如果主键已经存在则更新,如果不存在则插入。
-- 数据插入与hbase shell插入数据性质一致,如果插入相同主键的值,则保持最新的一条数据。
-- 直接 values 插入或更新
upsert into PHTEST1 values ('x0001','1','2','3');
upsert into PHTEST1 values ('x0001','1','22','3');

upsert into PHTEST1 values ('x0002','1','2','3');

-- 指定字段插入更新
upsert into PHTEST1 (pk,col1,col2,col3) values ('x0003','1','2','3');

# 查询
select * from PHTEST1;
select col1 from PHTEST1;
select t.col1 from PHTEST1 t;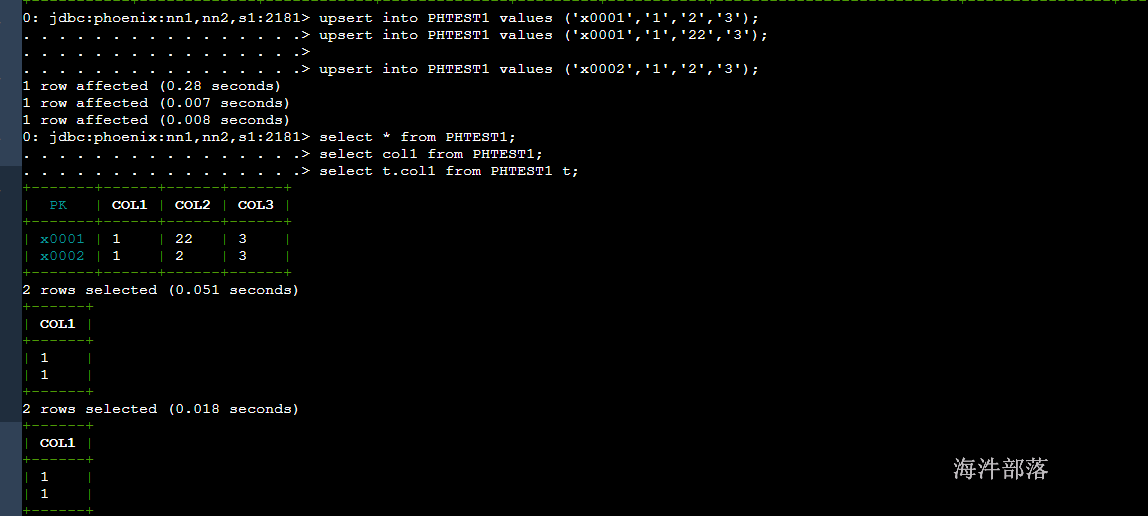
在hbase shell中查询

18.4 测试删除
插入多行,删除其中某一行
-- 插入多行,一次只能插入一行,不能插入多行
upsert into PHTEST1 values ('x0002','2','3','4');
upsert into PHTEST1 values ('x0003','3','4','5');
upsert into PHTEST1 values ('x0004','4','5','6');
-- 查询验证
select * from PHTEST1;
-- 删除一行
delete from PHTEST1 where col1='2';
-- 查询验证
select * from PHTEST1;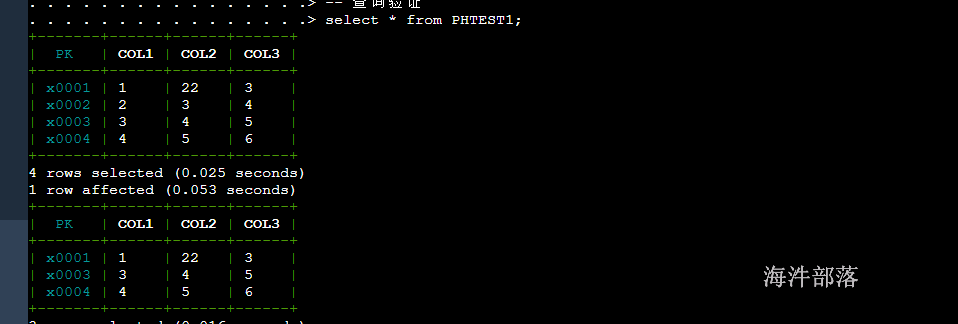
18.5 查询导入
-- 使用select查询结果集批量更新表
-- 创建一张临时表PHTEST2
create table PHTEST2(
    pk varchar not null primary key,
    col1 varchar,
    col2 varchar,
    col3 varchar
);
-- 临时表插入数据,比phtest1表多了'x0005'、'x0006'和'x0002'三行,其中'x0003'、'x0004'与phtest1的一致
upsert into PHTEST2 values ('x0001','newvalue','newvalue','newvalue');
upsert into PHTEST2 values ('x0002','newvalue','newvalue','newvalue');
upsert into PHTEST2 values ('x0003','3','4','5');
upsert into PHTEST2 values ('x0004','4','5','6');
upsert into PHTEST2 values ('x0005','newvalue','newvalue','newvalue');
upsert into PHTEST2 values ('x0006','newvalue','newvalue','newvalue');

-- 执行批量更新, 将PHTEST2表的数据覆盖到PHTEST1表
upsert into PHTEST1 select * from PHTEST2;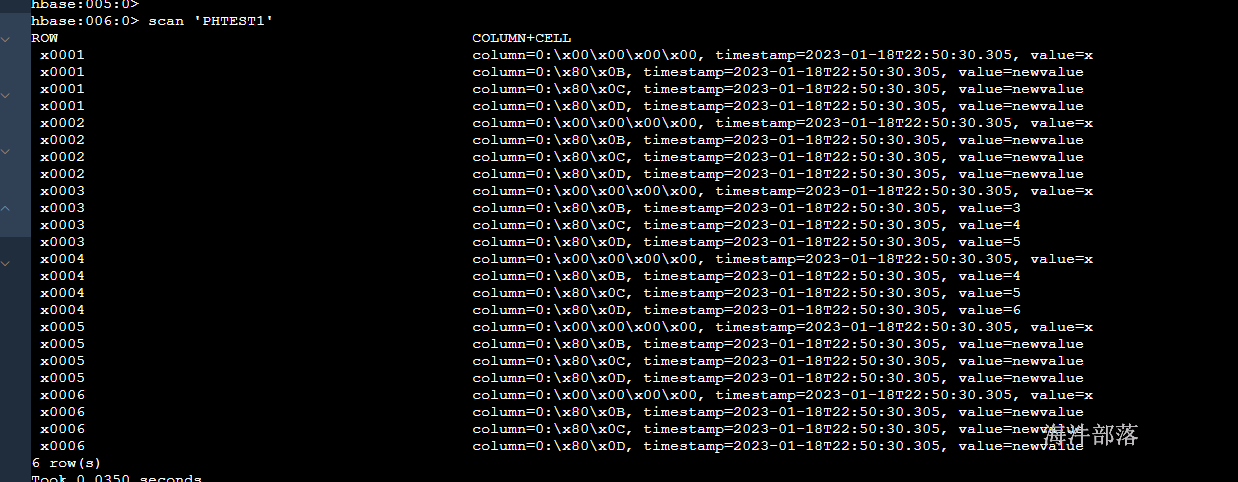
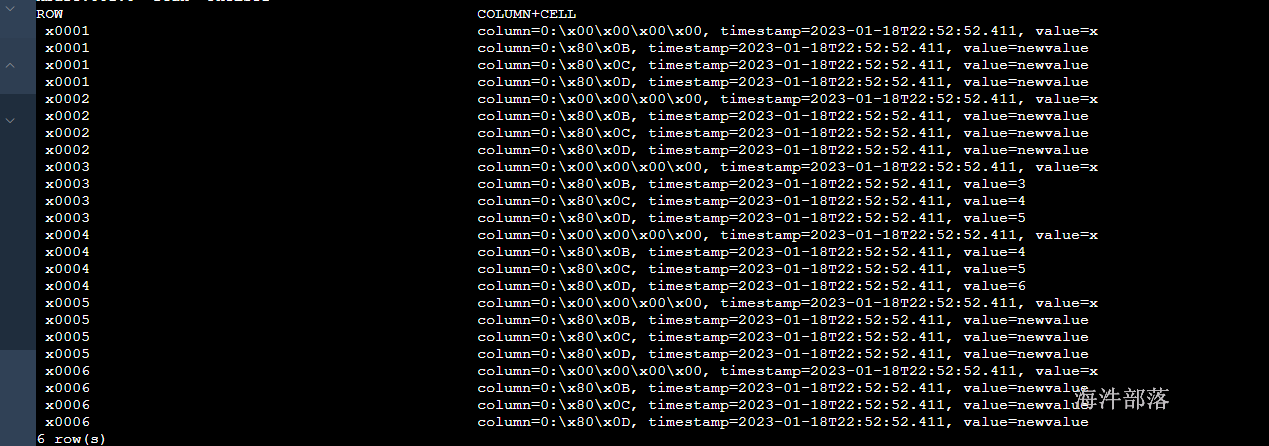
发现版本发生了变化
18.6 删除表
drop table PHTEST2;18.7 统计查询
select count(1) from PHTEST1;
select count(distinct col1) from PHTEST1;
select sum(num) from (select col1, count(*) as num from PHTEST1 group by col1) t1;

select col1, count(*) as num from PHTEST1 group by col1 order by num desc;
18.8 数据导入
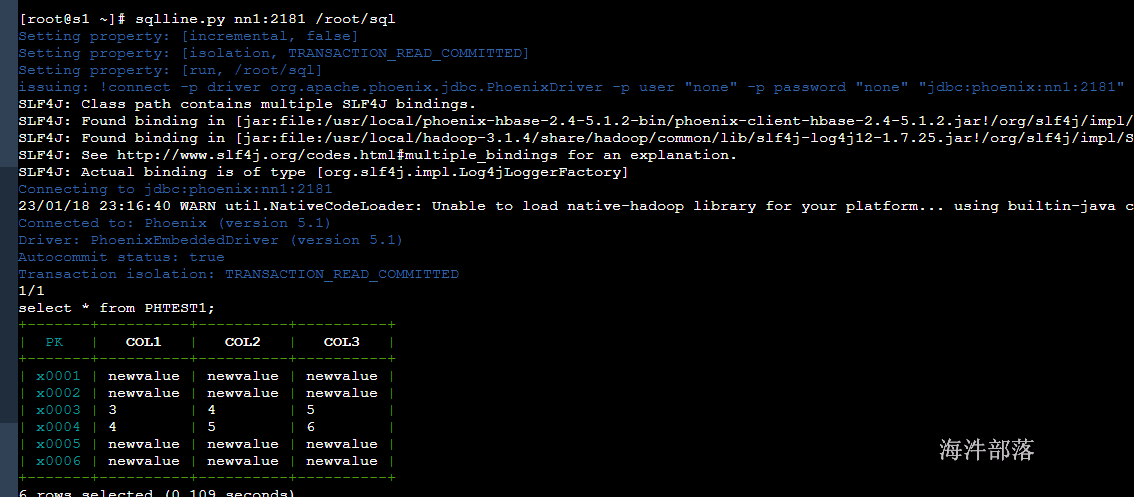
使用官方提供的数据样例,phoenix数据导入只支持csv文件格式。
# 在客户端外
# 执行SQL文件
# 对标hive的-f test.sql ${hiveconf:batch_date}
# 创建sql文件 select * from PHTEST1
sqlline.py nn1:2181 /root/sql

# 创建表
create table user(id varchar primary key,name varchar,age varchar);
# 创建csv文件 /root/user.csv
# 输入文件内容
# 1,zhangsan,20
# 2,lisi,30
 psql.py -t USER nn1:2181 /root/user.csv
# 注意:
#   1)phoenix数据导入只支持后缀为.csv的文件, csv文件名称不需要和表名称一致,文件名可以小写
#   2)指定的表必须是大写,小写就报错

18.9 在phoenix建表时指定列族
-- 用 列族名.字段名
create table "cftest" (
    pk varchar not null primary key,
    cf1.col1 varchar,
    cf2.col2 varchar);

-- 查询时可以不用列族
select col1 from "cftest"

18.10 在phoenix建表时指定压缩格式
-- 在后面可指定压缩格式
create table "comptest" (
    pk varchar not null primary key,
    cf1.col1 varchar,
    cf2.col2 varchar)
    compression='snappy';
18.11 在phoenix建表时预分region
-- 用 split on ('x0001','x0002','x0003','x0004','x0005') 来进行预分region
-- 其中 on 里面的 是 splitkey
create table "split_region_test" (
    pk varchar not null primary key,
    cf1.col1 varchar,
    cf2.col2 varchar)
    compression='snappy'
    split on ('x0001','x0002','x0003','x0004','x0005');
查看hbase web ui:

18.12 phoenix与hbase表关联
1)在hbase中创建带有命名空间的表,并添加数据
create 'hainiu:relatetable_1',{NAME => 'cf1',COMPRESSION => 'snappy'},{NAME => 'cf2',COMPRESSION => 'snappy'}

# 添加数据
put 'hainiu:relatetable_1','x0001','cf1:name','user1'
put 'hainiu:relatetable_1','x0002','cf1:name','user2'
put 'hainiu:relatetable_1','x0001','cf1:age','20'
put 'hainiu:relatetable_1','x0002','cf1:age','21'
put 'hainiu:relatetable_1','x0001','cf2:address','beijing'
put 'hainiu:relatetable_1','x0002','cf2:address','shanghai'
2)在phoenix中创建schema(schema相当于命名空间)
-- 先在phoenix中创建schema,对应hbase的namespace
create schema if not exists "hainiu";
执行报错:
cannot create scheme because config phoenix.scheme.isNamespaceMappingEnabled for enabling name space mapping isn`t enabled.schemaName='hainiu'在phoenix中创建schema报错解决方式:在hbase的hbase-site.xml中添加phoenix.schema.isNamespaceMappingEnabled=true和phoenix.schema.mapSystemTablesToNamespace=true
<property>
    <name>phoenix.schema.isNamespaceMappingEnabled</name>
    <value>true</value>
</property>
<property>
    <name>phoenix.schema.mapSystemTablesToNamespace</name>
    <value>true</value>
</property>
在hbase和Phoenix的配置文件hbase-site.xml中都要增加这个配置
增加以上配置
# 分发五台机器
scp_all.sh /usr/local/hbase/conf/hbase-site.xml /usr/local/hbase/conf/
scp_all.sh /usr/local/phoenix/bin/hbase-site.xml /usr/local/phoenix/bin/
重启hbase集群
stop-hbase.sh
start-hbase.sh
重新进入Phoenix 客户端
-- 退出客户端
!q
-- 进入客户端
sqlline.py nn1:2181

-- 先在phoenix中创建schema,对应hbase的namespace
create schema if not exists "hainiu";
3)创建带有命名空间的表
-- 在phoenix创建'hainiu:relatetable'的关联表
-- 其中: column_encoded_bytes=0 是把字段名转成字符串,而不是原来的byte数组
create table "hainiu"."relatetable_2"(
    id varchar not null primary key,
    "cf1"."name" varchar,
    "cf1"."age" varchar,
    "cf2"."address" varchar
) column_encoded_bytes=0;

-- 在phoenix中插入一条数据测试
upsert into "hainiu"."relatetable_2" (id,"cf1"."name","cf1"."age","cf2"."address") values ('x0003','user3','22','guangzhou');

select * from "hainiu"."relatetable_2";
select "name" from "hainiu"."relatetable_2";
select "cf1"."name" from "hainiu"."relatetable_2";

-- 没有给进行BYTES.tostring
create table "hainiu"."relatetable_3"(
    id varchar not null primary key,
    "cf1"."name" varchar,
    "cf1"."age" varchar,
    "cf2"."address" varchar
);
upsert into "hainiu"."relatetable_3" (id,"cf1"."name","cf1"."age","cf2"."address") values ('x0003','user3','22','guangzhou');
建表语句中带有 column_encoded_bytes=0, 从hbase查询,字段名能看得懂:

建表语句中不带有 column_encoded_bytes=0, 从hbase查询,字段名看不懂:

18.13 phoenix建表时指定组合rowkey
-- 通过 CONSTRAINT pk primary key ( prefix,id )  设定联合主键,作为rowkey
-- 当prefix和id作为联合主键, 只在hbase的rowkey中存在, column里没有
-- 建表语句
create table "hainiu"."combinationkey_table1" (
    prefix varchar not null,
    id varchar not null,
    col1 varchar,
    col2 varchar
    CONSTRAINT pk primary key ( prefix,id )
)
    column_encoded_bytes=0,
    compression='snappy'
    split on ('1','2','|');

-- 插入数据
upsert into "hainiu"."combinationkey_table1" (prefix,id,col1,col2) values ('1','001','user1','20');
upsert into "hainiu"."combinationkey_table1" (prefix,id,col1,col2) values ('1','002','user2','21');

-- 查看表结构
!describe "hainiu"."combinationkey_table"
添加数据后:

查看hbase表:

18.14 phoenix实现动态列
-- 创建表
create table "hainiu"."dynamic_table1"(
    pk varchar not null primary key,
    col1 varchar,
    col2 varchar
)column_encoded_bytes=0;

-- 插入数据
upsert into "hainiu"."dynamic_table1"  (pk,col1,col2) values ('x0001','user1','20');
upsert into "hainiu"."dynamic_table1"  (pk,col1,col2) values ('x0002','user1','21');
upsert into "hainiu"."dynamic_table1"  (pk,col1,col2) values ('x0003','user1','22');
upsert into "hainiu"."dynamic_table1"  (pk,col1,col2) values ('x0004','user1','23');

-- 动态插入列
-- 动态插入 col3 和 col4 列
upsert into "hainiu"."dynamic_table1" (pk,col1,col2,col3 varchar,col4 varchar) values ('x0005','user1','23','beijing','hainiu');
-- 动态插入 col4 和 col5 列
upsert into "hainiu"."dynamic_table1" (pk,col1,col2,col4 varchar,col5 varchar) values ('x0006','user2','32','huawei','30K');

-- 动态插入 col3、col4、col5 列
upsert into "hainiu"."dynamic_table1" (pk,col1,col2,col3 varchar,col4 varchar,col5 varchar) values ('x0007','user3','33','shanghai','ali','22K');
-- 动态插入 col3、col4、col5、col6 列
upsert into "hainiu"."dynamic_table1" (pk,col1,col2,col3 varchar,col4 varchar,col5 varchar,col6 varchar) values ('x0008','user4','35','shanghai','baidu','12K','false');

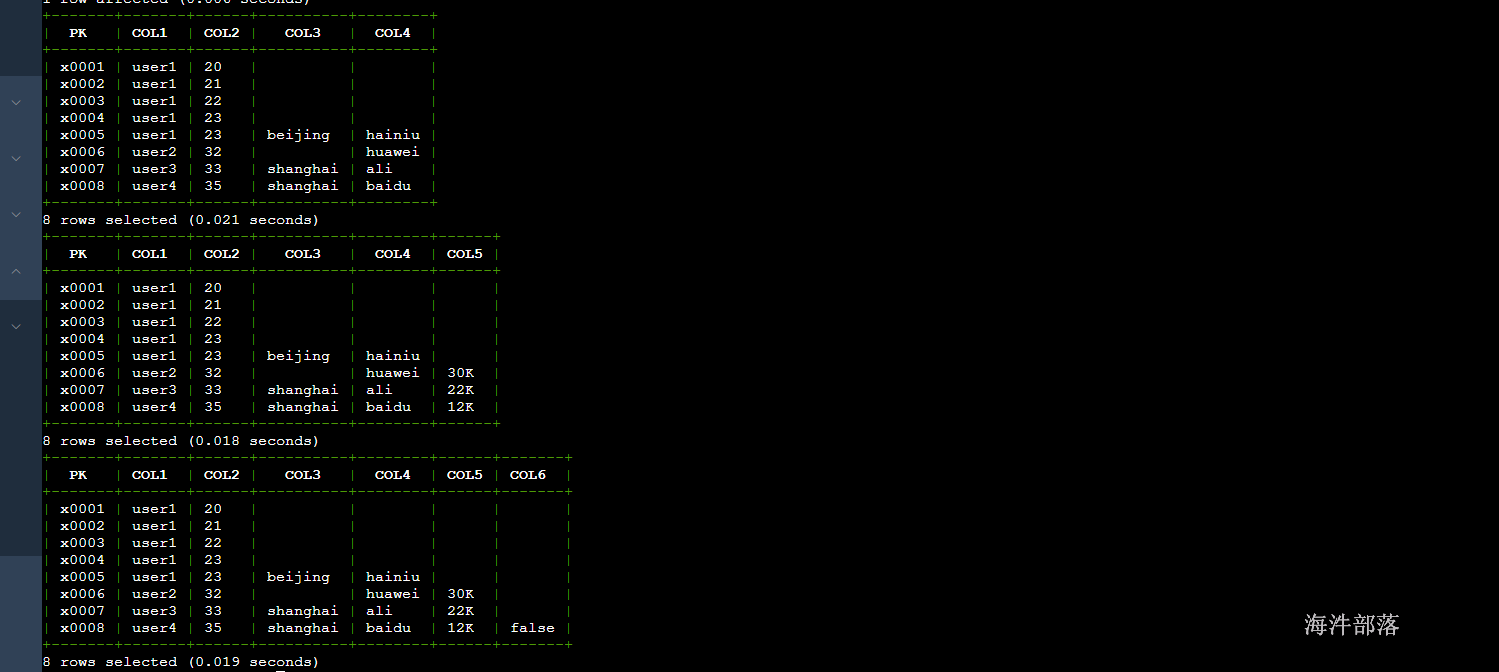
-- phoenix中查询动态列
select * from "hainiu"."dynamic_table1"(col3 varchar,col4 varchar);
select * from "hainiu"."dynamic_table1"(col3 varchar,col4 varchar,col5 varchar) ;
select * from "hainiu"."dynamic_table1"(col3 varchar,col4 varchar,col5 varchar,col6 varchar) ;
select * from "hainiu"."dynamic_table"(col3 varchar,col4 varchar);
select * from "hainiu"."dynamic_table"(col3 varchar,col4 varchar,col5 varchar) ;
select * from "hainiu"."dynamic_table"(col3 varchar,col4 varchar,col5 varchar,col6 varchar) ;
18.15 索引
18.15.1 开启索引
配置hbase的hbase-site.xml
<property>
    <name>hbase.regionserver.wal.codec</name>
    <value>org.apache.hadoop.hbase.regionserver.wal.IndexedWALEditCodec</value>
</property>
#分发到不同的机器
scp_all.sh /usr/local/hbase/conf/hbase-site.xml /usr/local/hbase/conf/
#重启hbase集群
stop-hbase.sh
start-hbase.sh
# 删除Phoenix中的配置文件
ssh_all.sh rm -rf /usr/local/phoenix/bin/hbase-site.xml
# 将hbase的配置文件给Phoenix
ssh_all.sh cp /usr/local/hbase/conf/hbase-site.xml /usr/local/phoenix/bin/18.15.2 数据准备
-- 创建测试表
create table "hainiu"."testindex"(
    pk varchar not null primary key,
    col1 varchar
)column_encoded_bytes=0;

-- 插入数据
upsert into "hainiu"."testindex" values ('x1','1');
……
upsert into "hainiu"."testindex" values ('x20000','20000');
-- 编写脚本,生成SQL文件
[root@worker-1 hdfs_test]# vim s1.sh
#! /bin/bash

for((i=1;i<=20000;i++))
do
        echo "upsert into \"hainiu\".\"testindex\" values ('x${i}','${i}');" >> testindex.sql
done

-- 执行SQL文件导入表
sqlline.py nn1:2181 testindex.sql

18.15.3 索引开启前查询
-- 查看执行计划,发现全表扫描
explain select * from "hainiu"."testindex1" where COL1 = '200';
-- 查询
select * from "hainiu"."testindex1" where COL1 = '200';
通过执行计划可以发现,查询为FULL SCAN。
18.15.4 索引操作
-- 基于 COL1字段 创建索引, 当创建完后,索引里存的是已经排序好的COL1数据
-- local index 适用于写操作频繁的场景。索引数据和数据表的数据是存放在相同的服务器中的,避免了在写操作的时候往不同服务器的索引表中写索引带来的额外开销
create local index myindex1 on "hainiu"."testindex" (COL1);

-- 查看执行计划,发现不全表扫描
explain select * from "hainiu"."testindex" where COL1 = '200';
select * from "hainiu"."testindex" where COL1 = '200';

-- 删除索引
drop index myindex on "hainiu"."testindex";
18.16 api 操作Phoenix
<dependency>
    <groupId>org.apache.phoenix</groupId>
    <artifactId>phoenix-client-hbase-2.4</artifactId>
    <version>5.1.2</version>
</dependency>
查询数据整体代码如下
package com.hainiu.hbase;

import java.sql.Connection;
import java.sql.DriverManager;
import java.sql.PreparedStatement;
import java.sql.ResultSet;

public class TestSelete {
    public static void main(String[] args) throws Exception{
        Connection connection = DriverManager.getConnection("jdbc:phoenix:nn1:2181");
        PreparedStatement prp = connection.prepareStatement("select * from PHTEST1");
        ResultSet res = prp.executeQuery();
        while(res.next()){
            String pk = res.getString("pk");
            String col1 = res.getString("col1");
            System.out.println(pk+"----"+col1);
        }
    }
}


