安装部署
部署hive非常简单只要下载稳定版本,解压开就可以使用,当然也可以通过源码编译部署。hive发展到现在已经有hive-1.x.y和hive-2.x.y版本,hive2版本代码层面改动比较大,有些特性不向前兼容,不在支持hadoop1。
Hive-on-MR is deprecated in Hive 2 and may not be available in the future versions. Consider using a different execution engine (i.e. tez, spark) or using Hive 1.X releases.
下载稳定的发行版本Download a release
$ cd /usr/local
$ wget http://apache.fayea.com/hive/stable-2/apache-hive-2.1.0-bin.tar.gz
$ tar xzvf apache-hive-2.1.0-bin.tar.gz
$ ln -s apache-hive-2.1.0-bin hive
$ export HIVE_HOME=/usr/local/hive
$ export PATH=$HIVE_HOME/bin:$PATH
hive提供的主要可执行命令:
| 命令 | 说明 |
|---|---|
| beeline | Beeline是hive 0.11引入的新的交互式CLI,它基于SQLLine,可以作为Hive JDBC Client端访问Hive Server 2,启动一个beeline就是维护了一个session。 |
| hive | 交互式CLI,hive维护操作的重要工具 |
| hive-config.sh | 加载公共环境变量配置 |
| hiveserver2 | 基于Thrift实现服务,HiveServer2支持多客户端的并发和认证,为开放API客户端如JDBC、ODBC提供了更好的支持 |
| metatool | 元数据服务命令,启动后对外提供元数据访问接口 |
元数据配置
启动cli,2.0会报错,需要先执行元数据初始化 schematool,hive支持多种数据库存放元数据derby|mysql|postgres|oracle。
usage: schemaTool
 -dbOpts <databaseOpts>             Backend DB specific options
 -dbType <databaseType>             Metastore database type
 -dryRun                            list SQL scripts (no execute)
 -help                              print this message
 -info                              Show config and schema details
 -initSchema                        Schema initialization
 -initSchemaTo <initTo>             Schema initialization to a version
 -passWord <password>               Override config file password
 -upgradeSchema                     Schema upgrade
 -upgradeSchemaFrom <upgradeFrom>   Schema upgrade from a version
 -userName <user>                   Override config file user name
 -verbose                           only print SQL statements
使用derby数据存放元数据实例
$ schematool -dbType derby -initSchema
Metastore connection URL:    jdbc:derby:;databaseName=metastore_db;create=true
Metastore Connection Driver :    org.apache.derby.jdbc.EmbeddedDriver
Metastore connection User:   APP
Starting metastore schema initialization to 2.1.0
Initialization script hive-schema-2.1.0.derby.sql
Initialization script completed
schemaTool completed

$ schematool -dbType derby -info
Metastore connection URL:    jdbc:derby:;databaseName=metastore_db;create=true
Metastore Connection Driver :    org.apache.derby.jdbc.EmbeddedDriver
Metastore connection User:   APP
Hive distribution version:   2.1.0
Metastore schema version:    2.1.0
schemaTool completed
如果使用mysql需要在hive-site.xml 配置mysql jdbc信息:
<property>
  <name>javax.jdo.option.ConnectionURL</name>
  <value>jdbc:mysql://dbhost/hive_meta</value>
  <description>the URL of the MySQL database</description>
</property>

<property>
  <name>javax.jdo.option.ConnectionDriverName</name>
  <value>com.mysql.jdbc.Driver</value>
</property>

<property>
  <name>javax.jdo.option.ConnectionUserName</name>
  <value>username</value>
</property>

<property>
  <name>javax.jdo.option.ConnectionPassword</name>
  <value>userpassword</value>
</property>

<property>
  <name>datanucleus.autoCreateSchema</name>
  <value>false</value>
</property>

<property>
  <name>datanucleus.fixedDatastore</name>
  <value>true</value>
</property>

<property>
  <name>datanucleus.autoStartMechanism</name>
  <value>SchemaTable</value>
</property>

<property>
<name>hive.metastore.schema.verification</name>
<value>true</value>
</property>
从 http://www.mysql.com/downloads/connector/j/5.1.html 下载 MySQL JDBC 驱动程序。然后再将其复制到 $HIVE_HOME/lib 目录
$ schematool -dbType mysql -initSchema
Metastore connection URL:    jdbc:mysql://127.0.0.1/hive_meta
Metastore Connection Driver :    com.mysql.jdbc.Driver
Metastore connection User:   hive
Starting metastore schema initialization to 2.1.0
Initialization script hive-schema-2.1.0.mysql.sql
Initialization script completed
schemaTool completed
hive支持多种形式部署元数据
-
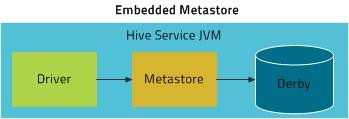
内嵌模式
采用derby数据库,只能单用户使用,一般是实验和测试场景使用。运行schematool或CLI命令后会在当前目录下创建元数据数据库:metastore_db。
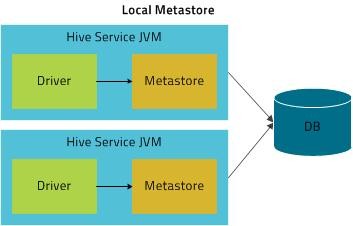
- 本地模式
使用C/S结构数据库,比如mysql,多个CLI进程可以连接统一元数据数据库,需要配置hive-site.xml,配置mysql jdbc连接.在这种模式下,Hive Metastore 服务作为主 HiveServer 进程在相同的进程中运行,但 Metastore 数据库在单独的进程中运行,可以位于单独的主机上。嵌入式 Metastore 服务与 Metastore 数据库通过 JDBC 通信。

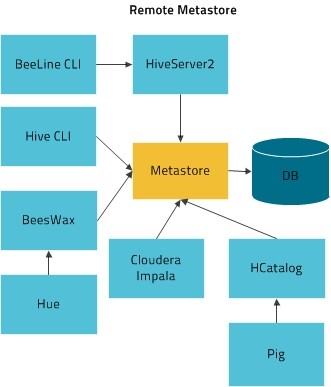
- 远程模式
远程模式元数据以独立服务对外提供接口,所有的其它组件通过metastore接口访问元数据。远程模式胜过本地模式的主要优势是,远程模式不要求管理员与每个 Hive 用户共享 Metastore 数据库的 JDBC 登录信息。
在生产环境中使用Hive,强烈建议使用HiveServer2来提供服务,主要优点:
- 在应用端不用部署Hadoop和Hive客户端;
- 相比hive-cli方式,HiveServer2不用直接将HDFS和Metastore暴漏给用户;
- 有安全认证机制,并且支持自定义权限校验;
- 有HA机制,解决应用端的并发和负载均衡问题;
- JDBC方式,可以使用任何语言,方便与应用进行数据交互;
- 从2.0开始,HiveServer2提供了WEB UI

启用远程模式需要配置:
<property>
  <name>hive.metastore.uris</name>
  <value>thrift://<n.n.n.n>:9083</value>
  <description>可以配置多个uri,逗号分隔,客户端随机选取</description>
</property>
<property>
  <name>hive.metastore.warehouse.dir</name>
  <value>/user/hive/warehouse</value>
  <description>location of default database for the warehouse</description>
</property>
远程模式需要独立启动metastore 服务:
$ hive --service metastore &HiveServer
HiveServer2 相对以前版本hiveserver做相应改进,支持多session并发和认证等。HiveServer2对外提供查询执行和获取结果接口,当前基于Thrift RPC实现。为开放API客户端如JDBC、ODBC提供了很好的支持。
Hiveserver2允许在配置文件hive-site.xml中进行配置管理,具体的参数为
hive.server2.thrift.min.worker.threads 最小工作线程数,默认为5。
hive.server2.thrift.max.worker.threads  最小工作线程数,默认为500。
hive.server2.thrift.port TCP 的监听端口,默认为10000。
hive.server2.thrift.bind.host TCP绑定的主机,默认为localhost。
hive.server2.global.init.file.location 可以设置全局初始化文件,文件为一系列的hive命令,对所有查询生效
hive.server2.logging.operation.enabled 开启纪录操作日志
hive.server2.logging.operation.log.location

hive.server2.webui.host   webui配置
hive.server2.webui.port
hive.hwi.war.file $HIVE_HOME/lib/hive-hwi-X.Y.war
hive.server2.webui.max.threads
也可以设置环境变量HIVE_SERVER2_THRIFT_BIND_HOST和HIVE_SERVER2_THRIFT_PORT覆盖hive-site.xml设置的主机和端口号。
从Hive-0.13.0开始,HiveServer2支持通过HTTP传输消息,该特性当客户端和服务器之间存在代理中介时特别有用。与HTTP传输相关的参数如下:
hive.server2.transport.mode – 默认值为binary(TCP),可选值HTTP。
hive.server2.thrift.http.port– HTTP的监听端口,默认值为10001。
hive.server2.thrift.http.path – 服务的端点名称,默认为 cliservice。
hive.server2.thrift.http.min.worker.threads– 服务池中的最小工作线程,默认为5。
hive.server2.thrift.http.max.worker.threads– 服务池中的最小工作线程,默认为500。
启动服务:
$ $HIVE_HOME/bin/hiveserver2HiveServer2 支持多种认证方式(Anonymous,SASL, Kerberos (GSSAPI),LDAP,Pluggable Custom)。默认情况下,HiveServer2以提交查询的用户执行查询(true),如果hive.server2.enable.doAs设置为false,查询将以运行hiveserver2进程的用户运行。
HiveServer高可用
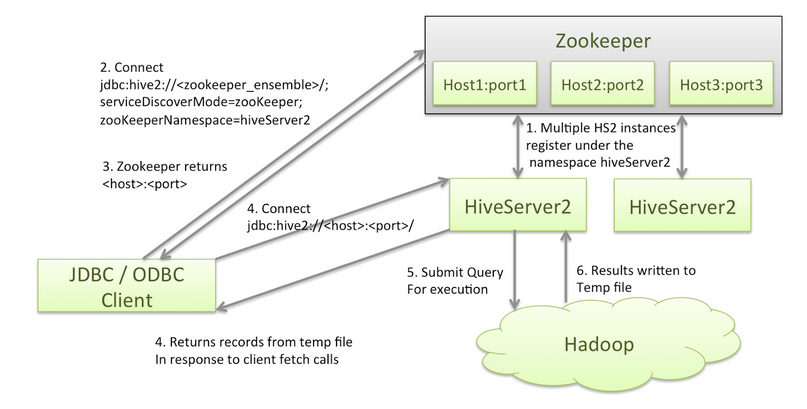
Hive从0.14开始,使用Zookeeper实现了HiveServer2的HA功能(ZooKeeper Service Discovery),Client端可以通过指定一个nameSpace来连接HiveServer2,而不是指定某一个host和port。

- 多个HiveServer2实例注册到ZooKeeper的一个命名空间中。
- 客户端驱动连接zookeeper地址
jdbc:hive2://<zookeeper_ensemble>;serviceDiscoveryMode=zooKeeper;zooKeeperNamespace=<hiveserver2_namespace>

示例:
jdbc:hive2://zk1:2181,zk2:2181,zk3:2181;serviceDiscoveryMode=zooKeeper;zooKeeperNamespace=hiveserver2- ZooKeeper随机返回一个HiveServer2实例地址
- 客户端根据返回的hiveserver地址进行连接和操作。
配置示例:
<property>
<name>hive.server2.support.dynamic.service.discovery</name>
<value>true</value>
</property>

<property>
<name>hive.server2.zookeeper.namespace</name>
<value>hiveserver2</value>
</property>

<property>
<name>hive.zookeeper.quorum</name>
<value>zk1:2181,zk2:2181,zk3:2181</value>
</property>

<property>
<name>hive.zookeeper.client.port</name>
<value>2181</value>
</property>

<property>
<name>hive.server2.thrift.bind.host</name>
<value>0.0.0.0</value>
</property>

<property>
<name>hive.server2.thrift.port</name>
<value>10000</value>
</property>


